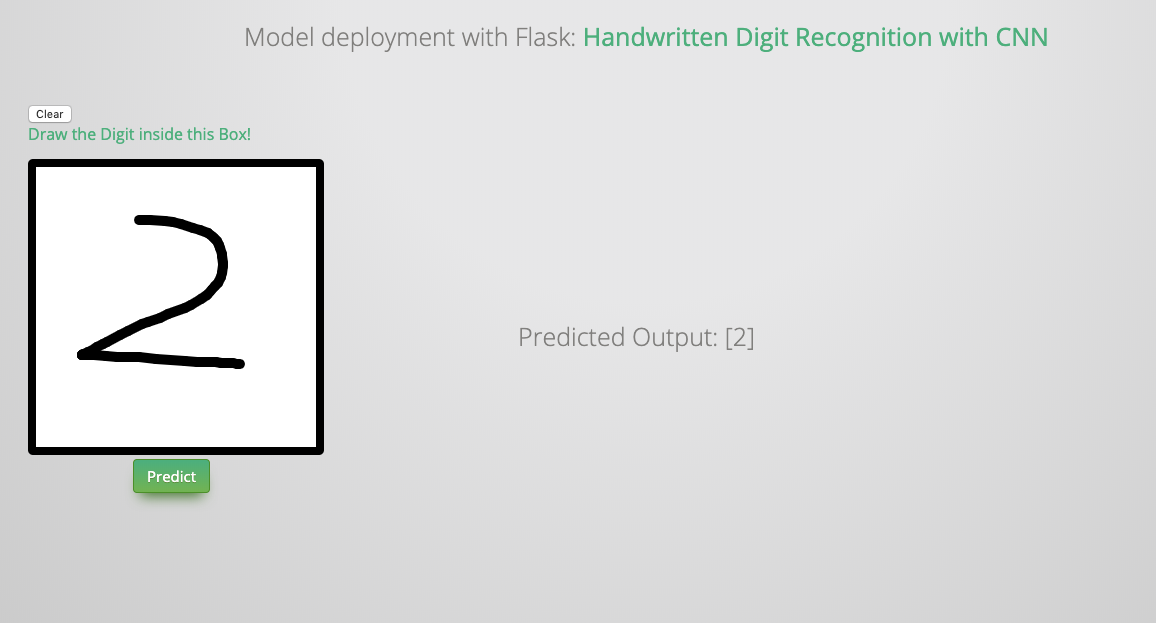
15. Model Deployment with Flask
In this chapter, you’ll learn how to deployment your model with flask. The main idea and code (I made some essential modification to make it work for Python 3) are from the Git repo:https://github.com/llSourcell/how_to_deploy_a_keras_model_to_production. So the copyright belongs to the original author.
15.1. Install flask
pip install Flask
15.2. Train and Save your model
You can use the following code to train and save your CNN model:
#python 2/3 compatibility
from __future__ import print_function
#simplified interface for building models
import keras
#our handwritten character labeled dataset
from keras.datasets import mnist
#because our models are simple
from keras.models import Sequential
#dense means fully connected layers, dropout is a technique to improve convergence, flatten to reshape our matrices for feeding
#into respective layers
from keras.layers import Dense, Dropout, Flatten
#for convolution (images) and pooling is a technique to help choose the most relevant features in an image
from keras.layers import Conv2D, MaxPooling2D
from keras import backend as K


#mini batch gradient descent ftw
batch_size = 128
#10 difference characters
num_classes = 10
#very short training time
epochs = 12

#input image dimensions
#28x28 pixel images.
img_rows, img_cols = 28, 28

#the data downloaded, shuffled and split between train and test sets
#if only all datasets were this easy to import and format
(x_train, y_train), (x_test, y_test) = mnist.load_data()

#this assumes our data format
#For 3D data, "channels_last" assumes (conv_dim1, conv_dim2, conv_dim3, channels) while
#"channels_first" assumes (channels, conv_dim1, conv_dim2, conv_dim3).
if K.image_data_format() == 'channels_first':
    x_train = x_train.reshape(x_train.shape[0], 1, img_rows, img_cols)
    x_test = x_test.reshape(x_test.shape[0], 1, img_rows, img_cols)
    input_shape = (1, img_rows, img_cols)
else:
    x_train = x_train.reshape(x_train.shape[0], img_rows, img_cols, 1)
    x_test = x_test.reshape(x_test.shape[0], img_rows, img_cols, 1)
    input_shape = (img_rows, img_cols, 1)

#more reshaping
x_train = x_train.astype('float32')
x_test = x_test.astype('float32')
x_train /= 255
x_test /= 255
print('x_train shape:', x_train.shape)
print(x_train.shape[0], 'train samples')
print(x_test.shape[0], 'test samples')

#convert class vectors to binary class matrices
y_train = keras.utils.to_categorical(y_train, num_classes)
y_test = keras.utils.to_categorical(y_test, num_classes)

#build our model
model = Sequential()
#convolutional layer with rectified linear unit activation
model.add(Conv2D(32, kernel_size=(3, 3),
                 activation='relu',
                 input_shape=input_shape))
#again
model.add(Conv2D(64, (3, 3), activation='relu'))
#choose the best features via pooling
model.add(MaxPooling2D(pool_size=(2, 2)))
#randomly turn neurons on and off to improve convergence
model.add(Dropout(0.25))
#flatten since too many dimensions, we only want a classification output
model.add(Flatten())
#fully connected to get all relevant data
model.add(Dense(128, activation='relu'))
#one more dropout for convergence' sake :)
model.add(Dropout(0.5))
#output a softmax to squash the matrix into output probabilities
model.add(Dense(num_classes, activation='softmax'))
#Adaptive learning rate (adaDelta) is a popular form of gradient descent rivaled only by adam and adagrad
#categorical ce since we have multiple classes (10)
model.compile(loss=keras.losses.categorical_crossentropy,
              optimizer=keras.optimizers.Adadelta(),
              metrics=['accuracy'])

#train
model.fit(x_train, y_train,
          batch_size=batch_size,
          epochs=epochs,
          verbose=1,
          validation_data=(x_test, y_test))
 #how well did it do?
score = model.evaluate(x_test, y_test, verbose=0)
print('Test loss:', score[0])
print('Test accuracy:', score[1])

#Save the model
# serialize model to JSON
model_json = model.to_json()
with open("model.json", "w") as json_file:
    json_file.write(model_json)
# serialize weights to HDF5
model.save_weights("model.h5")
print("Saved model to disk")
15.3. Deplyment with Flask
#our web app framework!

#you could also generate a skeleton from scratch via
#http://flask-appbuilder.readthedocs.io/en/latest/installation.html

#Generating HTML from within Python is not fun, and actually pretty cumbersome because you have to do the
#HTML escaping on your own to keep the application secure. Because of that Flask configures the Jinja2 template engine
#for you automatically.
#requests are objects that flask handles (get set post, etc)
from flask import Flask, render_template,request
#scientific computing library for saving, reading, and resizing images
#from scipy.misc import imsave, imread, imresize
# import cv2 library for saving, reading, and resizing images
import cv2
#for matrix math
import numpy as np
#for importing our keras model
import keras.models
#for regular expressions, saves time dealing with string data
import re
# for convert base64 string to image
import base64

#system level operations (like loading files)
import sys
#for reading operating system data
import os
#tell our app where our saved model is
sys.path.append(os.path.abspath("./model"))
from load import *
#initalize our flask app
app = Flask(__name__)
#global vars for easy reusability
global model, graph
#initialize these variables
model, graph = init()

#decoding an image from base64 into raw representation
def convertImage(imgData1):
        imgData1 = imgData1.decode("utf-8")
        imgstr = re.search(r'base64,(.*)',imgData1).group(1)
        #print(imgstr)
        imgstr_64 = base64.b64decode(imgstr)
        with open('output/output.png','wb') as output:
                output.write(imgstr_64)


@app.route('/')
def index():
        #initModel()
        #render out pre-built HTML file right on the index page
        return render_template("index.html")

@app.route('/predict/',methods=['GET','POST'])
def predict():
        #whenever the predict method is called, we're going
        #to input the user drawn character as an image into the model
        #perform inference, and return the classification
        #get the raw data format of the image
        imgData = request.get_data()
        #print(imgData)
        #encode it into a suitable format
        convertImage(imgData)
        print("debug")
        #read the image into memory
        x = cv2.imread('output/output.png',0)
        #compute a bit-wise inversion so black becomes white and vice versa
        x = np.invert(x)
        #make it the right size
        x = cv2.resize(x,(28,28))
        #imshow(x)
        #convert to a 4D tensor to feed into our model
        x = x.reshape(1,28,28,1)
        print("debug2")
        #in our computation graph
        with graph.as_default():
                #perform the prediction
                out = model.predict(x)
                #print(out)
                print(np.argmax(out,axis=1))
                print("debug3")
                #convert the response to a string
                response = np.array_str(np.argmax(out,axis=1))
                return response


if __name__ == "__main__":
        #decide what port to run the app in
        port = int(os.environ.get('PORT', 5000))
        #run the app locally on the givn port
        app.run(host='0.0.0.0', port=port)
        #optional if we want to run in debugging mode
        #app.run(debug=False)